Posts

Showing posts from April, 2013

Grace Type Settings

Control code Description \f{x} switch to font named "x" \f{n} switch to font number n \f{} return to original font \R{x} switch to color named "x" \R{n} switch to color number n \R{} return to original color \#{x} treat "x" (must be of even length) as list of hexadecimal char codes \t{xx xy yx yy} apply transformation matrix \t{} reset transformation matrix \z{x} zoom x times \z{} return to original zoom \r{x} rotate by x degrees \l{x} slant by factor x \v{x} shift vertically by x \v{} return to unshifted baseline \V{x} shift baseline by x \V{} reset baseline \h{x} horizontal shift by x \n new line \u begin underline \U stop underline \o begin overline \O stop overline \Fk enable kerning \FK disable kerning \...
Draw dipole vector of a tagged molecule in VMD

Image
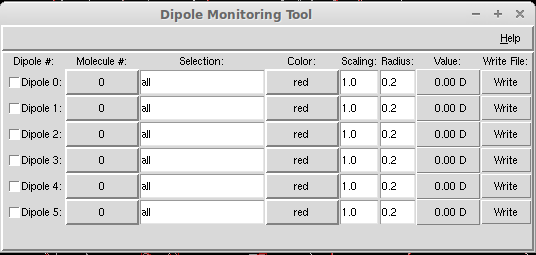
It is often needed to visualize the dipole orientation of a tagged molecule. The following steps will guide to achieve this Select the molecule by its resid  Open Tk console from drop down menu of Extensions → Tk Console  Select every atom of the molecule by separate nicknames, by using the following command. Let say we would like to see the dipole moment vector of water molecules, in that case, the following codes need to be used  set ow [atomselect top "type OW"]  set hw1 [atomselect top "type HW1"] set hw2 [atomselect top "type HW2"]  Then set charge of every atom by using the following commands  $ow set charge -1.00 $hw1 set charge -0.5 $hw2 set charge -0.5 Finally open the Etensions → Visualizations → Dipole Moment Watcher The following window will pop up Then select the molecules by its resid and change the color of the dipoles according to your need. One can select maximum of six dipoles to show at a time. The final snap will...

Copy single file in multiple folder using bash shell

Recursive copy echo folder1 folder2 folder3 | xargs -n 1 cp -f file or echo folder*/ | xargs -n 1 cp -f file

Mounting a remote directory to local PC using ssh

If one needs to mount any directory of HPC (or any other remote PCs) to his/her local desktop then the following steps to be followed Check for passwordless ssh login (if not generate by following this ) In local PC: install sshfs ln local PC: sshfs remote-login-details:/directory-to-be-mounted /mount-point-in-local-PC To unmount, use: fusermount -u /mount-point-in-local-PC

SSH login without password

Password less login over SSH First log in on A as user a and generate a pair of authentication keys. Do not enter a passphrase: a@A:~> ssh-keygen -t rsa Generating public/private rsa key pair. Enter file in which to save the key (/home/a/.ssh/id_rsa): Created directory '/home/a/.ssh'. Enter passphrase (empty for no passphrase): Enter same passphrase again: Your identification has been saved in /home/a/.ssh/id_rsa. Your public key has been saved in /home/a/.ssh/id_rsa.pub. The key fingerprint is: 3e:4f:05:79:3a:9f:96:7c:3b:ad:e9:58:37:bc:37:e4 a@A Now use ssh to create a directory ~/.ssh as user b on B. (The directory may already exist, which is fine): a@A:~> ssh b@B mkdir -p .ssh b@B's password: Finally append a's new public key to b@B:.ssh/authorized_keys and enter b's password one last time: a@A:~> cat .ssh/id_rsa.pub | ssh b@B 'cat >> .ssh/authorized_keys' b@B's password: From now on you can log into B as b from A as a ...

Grace Few Tips

XMGRACE and More Xmgrace is very nice software to create 2D plot. However, few things are not that "User friendly", one needs careful search for that. Although Grace User Guide and Grace forum are available to help user, I would like to list few tips which I need to use more frequently. Subscript & Superscript Subscript Let say we would like to write A b then the xmgrace syntax for that is A\sb\N Superscript Let say we would like to write A b then the xmgrace syntax for that is A\Sb\N Symbol The new method to insert special characters in xmgrace is: Press ctrl-e while positioned in a text-edit field, the font dialog box will pop up Select the desired font from the drop-down list.Use symbol to insert special symbols Click on the desired character Done! The other standard way of inserting special character is that writing the syntax (from the ASCII table ) in between \c and \C e.g. Angstrom (Å) \cE\C Copyright (©) \c)\C Link to ASCII chara...

ASCII-TABLE

Common ascii table  33 ! ¡ 34 " ¢ 35 # £ 36 $ ¤ 37 % ¥ 38 & ¦ 39 ' § 40 ( ¨ 41 ) © 42 * ª 43 + « 44 , ¬ 45 - ­ 46 . ® 47 / ¯ 48 0 ° 49 1 ± 50 2 ² 51 3 ³ 52 4 ´ 53 5 µ 54 6 ¶ 55 7 · 56 8 ¸ 57 9 ¹ 58 : º 59 ; » 60 < ¼ 61 = ½ 62 > ¾ 63 ? ¿ 64 @ À 65 A Á 66 B Â 67 C Ã 68 D Ä 69 E Å 70 F Æ 71 G Ç 72 H È 73 I É 74 J Ê 75 K Ë 76 L Ì 77 M Í 78 N Î 79 O Ï 80 P Ð 81 Q Ñ 82 R Ò 83 S Ó 84 T Ô 85 U Õ 86 V Ö 87 W × 88 X Ø 89 Y Ù 90 Z Ú 91 [ Û 92 \ Ü 93 ] Ý 94 ^ Þ 95 _ ß 96 ` à 97 a á 98 b â 99 c ã 100 d ä 101 e å 102 f æ 103 g ç 104 h è 105 i é 106 j ê 107 k ë 108 l ì 109 m í 110 n î 111 o ï 112 p ð 113 q ñ 114 r ò 115 s ó 116 t ô 117 u õ 118 v ö 119 w ÷ 120 x ø 121 y ù 122 z ú 123 { û 124 | ü 125 } ý 126 ~ þ